Learn how to use VoiceboxMD to dictate clinical notes faster on Mac and Windows. This guide covers setup, interface modes, the built-in Notepad, keyboard shortcuts, and preferences.
1. Interface Overview #
The VoiceboxMD desktop app is a compact, always-on-top widget that stays out of your way while you work inside any EHR or text field. It has three visible elements: the VB label, a central microphone button, and a sidebar arrow that reveals additional controls.

The widget is draggable so you can position it anywhere on your screen. Click the ⋮⋮ (six-dot grip) at the top to reposition it. Click × to close the widget.
2. Dictation Modes #
VoiceboxMD cycles through three states as you dictate. Understanding these visual cues helps you know exactly when the app is listening and when your speech is being transcribed.
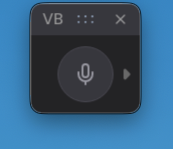
Grey microphone. The app is running but not listening. Press your hotkey or click the mic to begin.
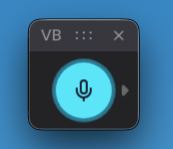
Cyan (teal) microphone. VoiceboxMD is actively capturing your voice and preparing to transcribe.
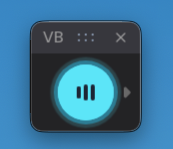
Waveform icon on the cyan button. Your speech is being converted to text in real time.
How do I know it’s working? When the microphone button turns cyan and displays a waveform animation, your words are actively being transcribed into whichever text field your cursor is positioned in.
3. Keyboard Shortcuts
#
You do not need to click the microphone button with your mouse. VoiceboxMD supports system-wide keyboard shortcuts so you can start and stop dictation without leaving your EHR.
| Platform | Action | Shortcut |
|---|---|---|
| Mac | Push-to-talk (hold to dictate, release to stop) | ⌥ Option (left side) |
| Windows | Toggle dictation on / off | Alt (right) + V |
| Both | Insert Notepad text at cursor | Say “Insert” |
Mac users: Push-to-talk means you hold the left ⌥ Option key while speaking and release it when you are done. This gives you precise control over when VoiceboxMD listens.
Windows users: The toggle behavior means you press Alt (right) + V once to start dictating and press it again to stop. You do not need to hold the keys down.
4. Accessing Preferences & Settings
#
VoiceboxMD preferences let you configure language, punctuation, the Notepad, typing speed, and more. Here is how to access them.
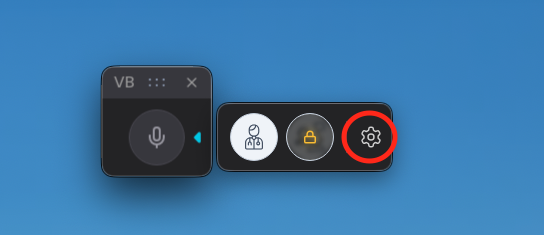
Step 1: Open the Sidebar #
Click the small arrow (▶) on the right side of the VoiceboxMD widget. This expands a secondary panel showing three icons: the AI Scribe modes or a lock icon, and a gear (⚙) icon.
Step 2: Configure Your Preferences #
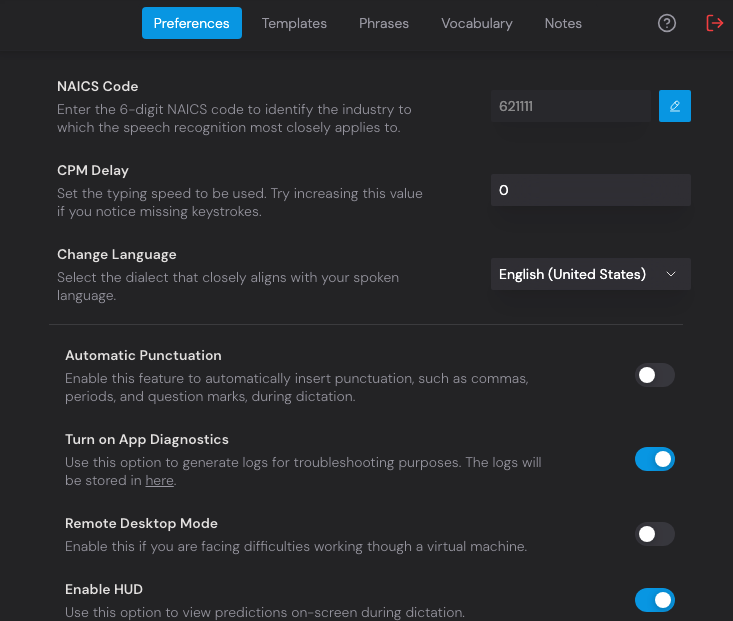
The Preferences window organizes your settings across five tabs: Preferences, Templates, Phrases, Vocabulary, and Notes.
Key settings on the Preferences tab include:
NAICS Code #
Set the 6-digit industry code (default 621111 for physician offices) so the speech engine prioritizes medical vocabulary relevant to your specialty.
CPM Delay #
Controls the typing speed into text fields. If you notice missing keystrokes in your EHR, increase this value. Default is 0 (fastest).
Change Language #
Select the English dialect that most closely matches your spoken accent. Default is English (United States).
Automatic Punctuation #
When enabled, VoiceboxMD inserts commas, periods, and question marks automatically as you speak.
Remote Desktop Mode #
Enable this if you are working through a virtual machine, Citrix, or remote desktop session and experiencing input issues.
Enable HUD #
Displays real-time transcription predictions on screen during dictation, letting you see what VoiceboxMD is hearing.
Notepad & Latency Settings #
Scroll down in Preferences to find two additional toggles:
Enable Notepad #
Turns on the floating Notepad that shows your transcription in real time. Useful for reviewing what was captured before inserting it into a text field.
No Delay #
Reduces transcription latency for near-instant text output. May slightly reduce accuracy. Ideal for fast-paced environments where speed matters most.
5. Using the Built-in Notepad #
The Notepad is a floating preview panel that appears below the VoiceboxMD widget when enabled in Preferences. As you dictate, your transcribed text appears here first, giving you a chance to review it before pasting it into your EHR or document.
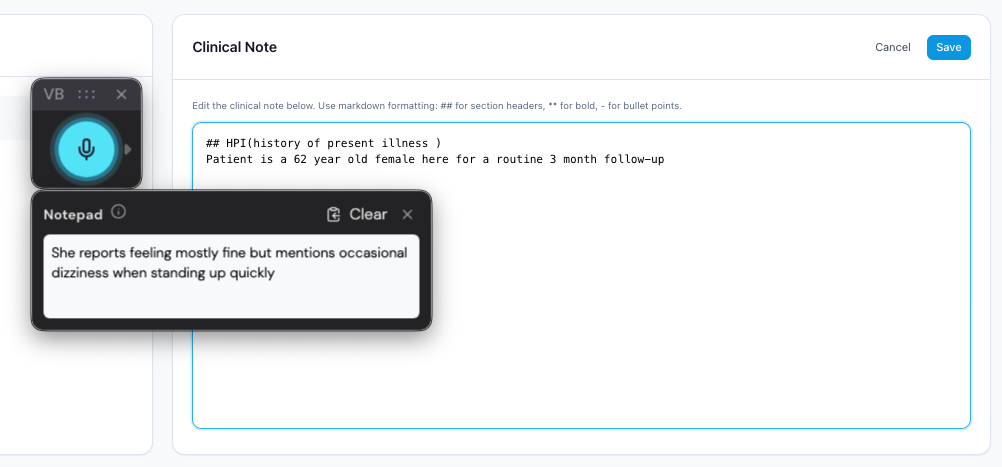
VoiceboxMD includes a structured Clinical Note editor that provides a formatted workspace for building complete patient documentation. Simply Say “Format”.
To transfer the Notepad text into any active text field, simply say the voice command “Insert”.
When to use the Notepad: The Notepad is especially useful when dictating into web-based EHRs (like Practice Fusion or Athena Health) where direct cursor injection may not work consistently. Dictate into the Notepad first, then insert the text with a single voice command.
Tips for Best Accuracy #
Speak at a Natural Pace #
You do not need to speak slowly or enunciate unnaturally. VoiceboxMD is trained on conversational physician speech patterns.
Use a Quality Microphone #
Built-in laptop microphones work, but a USB headset or professional handheld mic significantly improves accuracy in noisy environments.
Set Your NAICS Code #
Ensure your NAICS code is set to your specialty in Preferences. This helps the speech engine prioritize the right medical vocabulary.
Add Custom Vocabulary #
Use the Vocabulary tab in Preferences to add practice-specific terms, clinic names, referring physician names, and any unique terminology you use frequently.
Create Phrases and Templates #
Set up frequently used note structures, review-of-systems language, and counseling documentation in the Phrases and Templates tabs for one-command insertion.
Adjust CPM Delay for Your EHR #
If you notice dropped characters in web-based EHRs, increase the CPM Delay value in Preferences. This slows the typing speed to match what your EHR can process.